/\*\* \* Creates an Executor that uses a single worker thread operating \* off an unbounded queue. (Note however that ifthis single \* thread terminates due to a failure during execution prior to \* shutdown, a newone will take its place if needed to execute \* subsequent tasks.) Tasks are guaranteed to execute \* sequentially, and no more than one task will be active at any \* given time. Unlike the otherwise equivalent \* {@code newFixedThreadPool(1)} the returned executor is \* guaranteed not to be reconfigurable to use additional threads. \* \* @return the newly created single-threaded Executor \*/ publicstatic ExecutorService newSingleThreadExecutor() { returnnewFinalizableDelegatedExecutorService (newThreadPoolExecutor(1, 1, 0L, TimeUnit.MILLISECONDS, newLinkedBlockingQueue<Runnable>())); }
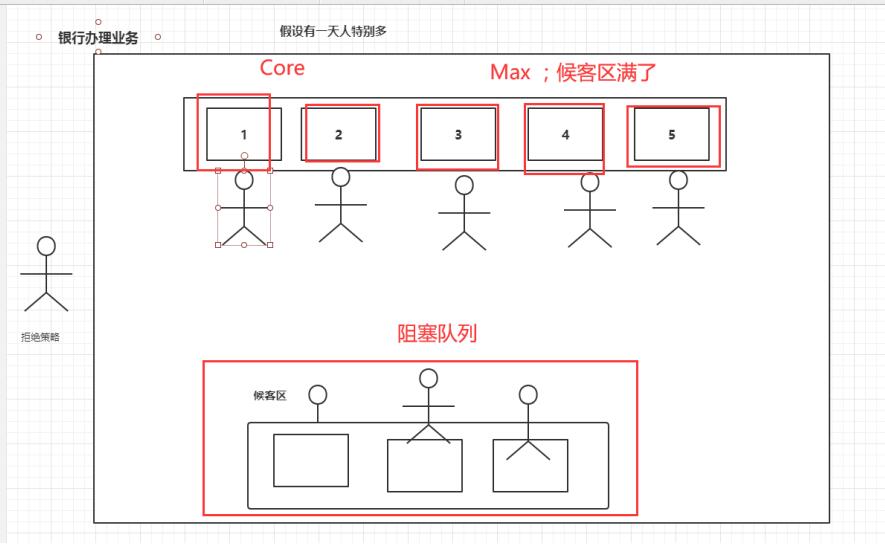
/\*\* \* Creates a new {@code ThreadPoolExecutor} with the given initial \* parameters. \* \* @param corePoolSize the number of threads to keep in the pool, even \* if they are idle, unless {@code allowCoreThreadTimeOut} is set \* @param maximumPoolSize the maximum number of threads to allow in the \* pool \* @param keepAliveTime when the number of threads is greater than \* the core, this is the maximum time that excess idle threads \* will wait fornewtasks before terminating. \* @param unit the time unit for the {@code keepAliveTime} argument \* @param workQueue the queue to use for holding tasks before they are \* executed. This queue will hold only the {@code Runnable} \* tasks submitted by the {@code execute} method. \* @param threadFactory the factory to use when the executor \* creates a newthread \* @param handler the handler to use when execution is blocked \* because the thread bounds and queue capacities are reached \* @throws IllegalArgumentException if one of the following holds:<br> \* {@code corePoolSize < 0}<br> \* {@code keepAliveTime < 0}<br> \* {@code maximumPoolSize <= 0}<br> \* {@code maximumPoolSize < corePoolSize} \* @throws NullPointerException if {@code workQueue} \* or {@code threadFactory} or {@code handler} is null \*/ publicThreadPoolExecutor(int corePoolSize, int maximumPoolSize, long keepAliveTime, TimeUnit unit, BlockingQueue<Runnable> workQueue, ThreadFactory threadFactory, RejectedExecutionHandler handler) { if (corePoolSize < 0 || maximumPoolSize <= 0 || maximumPoolSize < corePoolSize || keepAliveTime < 0) thrownewIllegalArgumentException(); if (workQueue == null || threadFactory == null || handler == null) thrownewNullPointerException(); this.acc = System.getSecurityManager() == null ? null : AccessController.getContext(); this.corePoolSize = corePoolSize; this.maximumPoolSize = maximumPoolSize; this.workQueue = workQueue; this.keepAliveTime = unit.toNanos(keepAliveTime); this.threadFactory = threadFactory; this.handler = handler; }
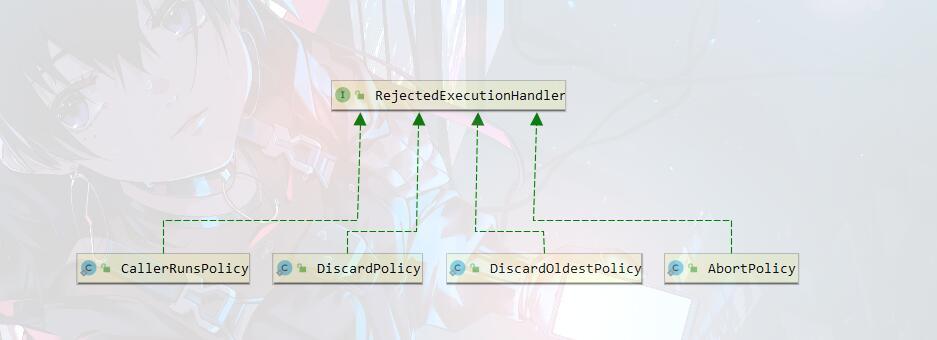
/\*\* \* A handler for rejected tasks that runs the rejected task \* directly in the calling thread of the {@code execute} method, \* unless the executor has been shut down, in which case the task \* is discarded. \*/ //用于拒绝任务的处理程序,可以直接在{@code execute}方法的调用线程中运 //行被拒绝的任务\*除非执行器已被关闭,否则这种情况下该任务将被丢弃。 //简单点就是谁调用谁执行 publicstaticclassCallerRunsPolicyimplementsRejectedExecutionHandler { /\*\* \* Creates a {@code CallerRunsPolicy}. \*/ publicCallerRunsPolicy() { } /\*\* \* Executes task r in the caller's thread, unless the executor \* has been shut down, in which case the task is discarded. \* \* @param r the runnable task requested to be executed \* @param e the executor attempting to execute this task \*/ public void rejectedExecution(Runnable r, ThreadPoolExecutor e) { if (!e.isShutdown()) { r.run(); } } } /\*\* \* A handler for rejected tasks that throws a \* {@code RejectedExecutionException}. \*/ //直接抛异常 public static class AbortPolicy implements RejectedExecutionHandler { /\*\* \* Creates an {@code AbortPolicy}. \*/ public AbortPolicy() { } /\*\* \* Always throws RejectedExecutionException. \* \* @param r the runnable task requested to be executed \* @param e the executor attempting to execute this task \* @throws RejectedExecutionException always \*/ public void rejectedExecution(Runnable r, ThreadPoolExecutor e) { throw new RejectedExecutionException("Task " + r.toString() + " rejected from " + e.toString()); } } /\*\* \* A handler for rejected tasks that silently discards the \* rejected task. \*/ //直接放弃 public static class DiscardPolicy implements RejectedExecutionHandler { /\*\* \* Creates a {@code DiscardPolicy}. \*/ public DiscardPolicy() { } /\*\* \* Does nothing, which has the effect of discarding task r. \* \* @param r the runnable task requested to be executed \* @param e the executor attempting to execute this task \*/ public void rejectedExecution(Runnable r, ThreadPoolExecutor e) { } } /\*\* \* A handler for rejected tasks that discards the oldest unhandled \* request and then retries {@code execute}, unless the executor \* is shut down, in which case the task is discarded. \*/ //放弃最旧未处理的程序 public static class DiscardOldestPolicy implements RejectedExecutionHandler { /\*\* \* Creates a {@code DiscardOldestPolicy} for the given executor. \*/ public DiscardOldestPolicy() { } /\*\* \* Obtains and ignores the next task that the executor \* would otherwise execute, if one is immediately available, \* and then retries execution of task r, unless the executor \* is shut down, in which case task r is instead discarded. \* \* @param r the runnable task requested to be executed \* @param e the executor attempting to execute this task \*/ public void rejectedExecution(Runnable r, ThreadPoolExecutor e) { if (!e.isShutdown()) { e.getQueue().poll(); e.execute(r); } } }
new ThreadPoolExecutor.AbortPolicy() // 银行满了,还有人进来,不处理这个人的,抛出异常
new ThreadPoolExecutor.CallerRunsPolicy() // 哪来的去哪里!
new ThreadPoolExecutor.DiscardPolicy() //队列满了,丢掉任务,不会抛出异常!
new ThreadPoolExecutor.DiscardOldestPolicy() //队列满了,尝试去和最早的竞争,也不会抛出异常!
/\*\* \* Represents a function that accepts one argument and produces a result. \* \* <p>This is a <a href="package-summary.html">functional interface</a> \* whose functional method is {@link #apply(Object)}. \* \* @param <T> the type of the input to the function \* @param <R> the type of the result of the function \* \* @since1.8 \*/ @FunctionalInterface publicinterfaceFunction<T, R> { /\*\* \* Applies this function to the given argument. \* \* @param t the function argument \* @return the function result \*/ R apply(T t);
T为传入参数的类型,R为返回参数的类型
测试:
1
2
3
4
5
6
7
8
9
10
11
12
13
14
15
16
17
18
19
/\*\* \* Function 函数型接口,有一个输入参数,一个输出 \* 只要是函数型接口 可以用lambda表达简化 \* @author 路飞 \* @create2021/1/20 \*/ publicclassDemo1 { publicstaticvoidmain(String[] args) { // Function function = new Function<String,String>() { // @Override // public String apply(String str) { // return str; // } // }; //使用lambda简化 Functionfunction= (str)->{return str;}; System.out.println(function.apply("1223")); } }
/\*\* \* Represents a predicate(boolean-valued function) of one argument. \* \* <p>This is a <a href="package-summary.html">functional interface</a> \* whose functional method is {@link #test(Object)}. \* \* @param <T> the type of the input to the predicate \* \* @since1.8 \*/ @FunctionalInterface publicinterfacePredicate<T> { /\*\* \* Evaluates this predicate on the given argument. \* \* @param t the input argument \* @return {@codetrue} if the input argument matches the predicate, \* otherwise {@codefalse} \*/ booleantest(T t);
/\*\* \* Represents an operation that accepts a single input argument and returns no \* result. Unlike most other functional interfaces, {@code Consumer} is expected \* to operate via side-effects. \* \* <p>This is a <a href="package-summary.html">functional interface</a> \* whose functional method is {@link #accept(Object)}. \* \* @param <T> the type of the input to the operation \* \* @since1.8 \*/ @FunctionalInterface publicinterfaceConsumer<T> { /\*\* \* Performs this operation on the given argument. \* \* @param t the input argument \*/ voidaccept(T t);
/\*\* \* Represents a supplier of results. \* \* <p>There is no requirement that a newor distinct result be returned each \* time the supplier is invoked. \* \* <p>This is a <a href="package-summary.html">functional interface</a> \* whose functional method is {@link #get()}. \* \* @param <T> the type of results supplied by this supplier \* \* @since1.8 \*/ @FunctionalInterface publicinterfaceSupplier<T> { /\*\* \* Gets a result. \* \* @return a result \*/ T get(); }