JUC并发编程系列(四) 17.Volatile
1.保证可见性
1 2 3 4 5 6 7 8 9 10 11 12 13 14 15 16 17 18 19 20 21 22 23 /\*\*@author 路飞@create 2021 /1 /20 public class JMMDemo1 {private volatile static int num = 0 ;public static void main (String[] args) {new Thread (()->{while (num == 0 ){try {2 );catch (InterruptedException e) {10 ;"num:" +num);
在上一篇的JMM中,我们提到,JMM是不能保证可见性的,main线程中把num置为10了,但新开的线程由于不知道到把num置为10,一直在while循环中跳不出来,程序出现死循环,解决的办法就是在num的声明中加入volatile,保证线程之间的可见性!
2.不保证原子性
原子性 : 不可分割
线程A在执行任务的时候,不能被打扰的,也不能被分割。要么同时成功,要么同时失败。
1 2 3 4 5 6 7 8 9 10 11 12 13 14 15 16 17 18 19 20 21 22 23 24 25 26 27 28 29 30 31 32 /\*\*@author 路飞@create 2021 /1 /20 public class JMMDemo2 {1. 加sync保证add的同步性2. 加lock 原理和sync一样 不演示3. AtomicInteger num = new AtomicInteger ();private volatile static int num = 0 ;public static void add () {public static void main (String[] args) {for (int i = 1 ; i <= 20 ; i++) {new Thread (()->{for (int j = 1 ; j <= 1000 ; j++) {while (Thread.activeCount()>2 ){ yield ();"num:" +num);
理论上,最后输出的num是20000,但结课确始终达不到。
可以到这很多朋友会想到用锁,加入sync或者lock保证线程的同步 ,没错这个方法可以达到我们的预期!
但若不加sync或者lock锁,怎么保证原子性呢?
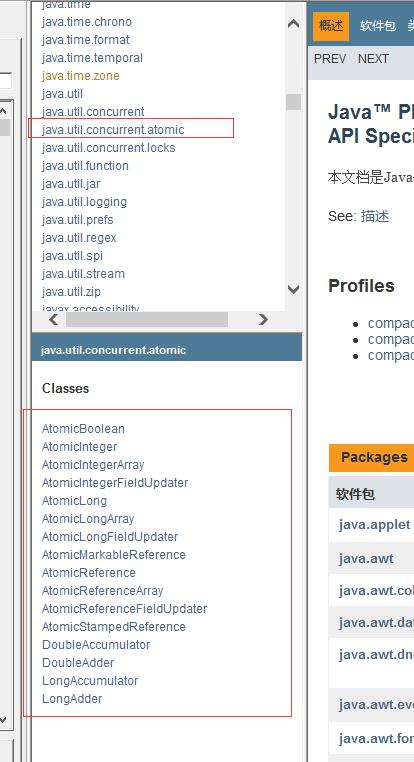
在反编译源文件后,发现最大的问题是这个num++方法不是原子性操作,那么可以使用JDK提供的原子类来解决原子性问题!
可以发现原子类是util下的一个大类,里面有很多基本类型和集合的原子类
引入原子类,改造我们的代码,实现Volatile保证原子性
1 2 3 4 5 6 7 8 9 10 11 12 13 14 15 16 17 18 19 20 21 22 23 24 25 26 27 28 29 30 31 32 /\*\*@author 路飞@create 2021 /1 /20 public class JMMDemo2 {1. 加sync保证add的同步性2. 加lock 原理和sync一样 不演示3. AtomicInteger num = new AtomicInteger ();private volatile static AtomicInteger num = new AtomicInteger ();public synchronized static void add () {public static void main (String[] args) {for (int i = 1 ; i <= 20 ; i++) {new Thread (()->{for (int j = 1 ; j <= 1000 ; j++) {while (Thread.activeCount()>2 ){ yield ();"num:" +num);
原子类的底层直接与操作系统挂钩,在内存中修改值,很安全!
3.禁止指令重排
什么是 指令重排:你写的程序,计算机并不是按照你写的那样去执行的。
源代码–>编译器优化的重排–> 指令并行也可能会重排–> 内存系统也会重排—> 执行
处理器在进行指令重排的时候,考虑:数据之间的依赖性 。
单线程环境里面确保程序最终执行结果和代码顺序执行结果一致。
处理器在进行指令重排序时必须考虑指令之间的数据依赖性
多线程环境中线程交替执行,由于编译器指令重排的存在,两个线程使用的变量能否保证一致性是无法确认的,结果无法预测。
1
2
3
4
5
6
int x = 1 ; int y = 2 ; 5 ; 1234 但是可能执行的时候回变成 2134 1324 4123 ? 当然可能!
可能造成影响的结果: a b x y 这四个值默认都是 0;
正常的结果: x = 0;y = 0;但是可能由于指令重排
�由于指令重排导致:x = 2;y = 1;
禁止指令重排底层原理
volatile实现禁止指令重排优化,从而避免多线程环境下程序出现乱序执行的现象
先了解下概念,内存屏障(Memory Barrier)又称内存栅栏,是一个CPU指令,它的作用有两个:
保证特定操作执行的顺序性 保证某些变量的内存可见性(利用该特性实现volatile内存可见性)
volatile实现禁止指令重排优化底层原理:
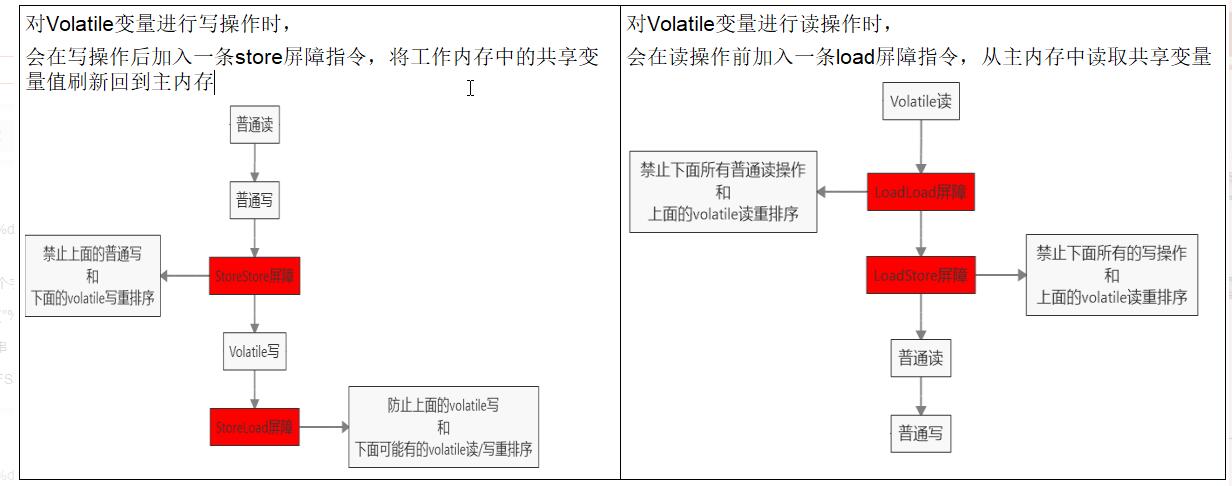
由于编译器和处理器都能执行指令重排优化。如果在指令间插入一条Memory Barrier则会告诉编译器和CPU,不管什么指令都不能和这条Memory Barrier指令重排,也就是说通过插入内存屏障,就能禁止在内存屏障前后的指令执行重排优化。内存屏障另外一个作用就是强制刷出各种CPU的缓存数据,因此任何CPU上的线程都能读取到这些数据的最新版本。
左边:写操作场景:先LoadStore指令,后LoadLoad指令。
右边:读操作场景:先LoadLoad指令,后LoadStore指令。
18.单例模式 手写单例模式也是面试必考的知识点!
饿汉式
1 2 3 4 5 6 7 8 9 10 11 12 13 14 15 16 17 /\*\*饿汉式单例@author 路飞@create 2021 /1 /22 public class Hungry {private byte [] data1 = new byte [1024 \*1024 ];private byte [] data2 = new byte [1024 \*1024 ];private byte [] data3 = new byte [1024 \*1024 ];private byte [] data4 = new byte [1024 \*1024 ];private Hungry () {private final static Hungry HUNGRY = new Hungry ();public static Hungry getInstance () {return HUNGRY;
DCl 饿汉式
这里通过多重检测,但最终都能被反射破坏,于是引入枚举 即可解决这个问题!
上代码:
1 2 3 4 5 6 7 8 9 10 11 12 13 14 15 16 17 18 19 20 21 22 23 24 25 26 /\*\*enum ? 本身也是一个类@author 路飞@create 2021 /1 /22 public enum EnumSingle {public EnumSingle getInstance () {return INSTANCE;class Test {public static void main (String[] args) throws Exception {EnumSingle instance1 = EnumSingle.INSTANCE;int .class);true );EnumSingle instance2 = declaredConstructor.newInstance();
1 2 3 4 5 6 7 8 9 10 11 12 13 14 15 16 17 18 19 20 21 22 23 24 25 26 27 28 29 30 31 32 33 34 35 36 37 38 39 40 41 42 43 44 45 46 47 48 49 50 51 52 53 54 55 56 57 58 59 60 61 62 63 64 65 66 67 68 /\*\*@author 路飞@create 2021 /1 /22 public class LazyMan {private static boolean luffy = false ;private LazyMan () {synchronized (LazyMan.class){if (luffy == false ){true ;else {throw new RuntimeException ("不要试图用反射破坏" );private volatile static LazyMan lazyMan;public static LazyMan getInstance () {if (lazyMan == null ){synchronized (LazyMan.class){if (lazyMan == null ){new LazyMan (); 1. 分配内存空间2. 执行构造方法,初始化对象3. 把对象指向在这个空间123 132 return lazyMan;public static void main (String[] args) throws Exception {Field luffy = LazyMan.class.getDeclaredField("luffy" );true );null );true );EnumSingle instance1 = EnumSingle.INSTANCE;EnumSingle instance2 = EnumSingle.INSTANCE;false );
枚举Enum是个抽象类,其实一旦一个类声明为枚举,实际上就是继承了Enum,所以会有(String.class,int.class)的构造器。既然是可以获取到父类Enum的构造器,那你也许会说刚才我的反射是因为自身的类没有无参构造方法才导致的异常 ,并不能说单例枚举避免了反射攻击。
这里有篇博客写的不错:
为什么要用枚举实现单例模式(避免反射、序列化问题)
19.深入理解CAS
什么是CAS
1 2 3 4 5 6 7 8 9 10 11 12 13 14 15 16 17 18 19 /\*\*@author 路飞@create 2021 /1 /22 public class CASDemo1 {public static void main (String[] args) {AtomicInteger atomicInteger = new AtomicInteger (2020 );2020 , 2022 ));2023 , 2022 ));
查看原子类源码
1
2
3
4
5
6
7
8
9
10
11
12
public class AtomicInteger extends Number implements java .io.Serializable {private static final long serialVersionUID = 6214790243416807050L ;private static final Unsafe unsafe = Unsafe.getUnsafe();private static final long valueOffset;static {try {"value" ));catch (Exception ex) { throw new Error (ex); }private volatile int value;
调用的Unsafe类,进入Unsafe发现都是大多数都是Native方法,说明Java并不能直接操作内存,而是操作C++去操作内存,实现CAS,所以CAS效率巨高!
1
2
3
4
5
6
7
public final int getAndAddInt (Object var1, long var2, int var4) {int var5;do {this .getIntVolatile(var1, var2);while (!this .compareAndSwapInt(var1, var2, var5, var5 + var4)); return var5;
CAS : 比较当前工作内存中的值和主内存中的值,如果这个值是期望的,那么则执行操作!如果不是就
一直循环!
缺点:
1、 循环会耗时
2、一次性只能保证一个共享变量的原子性
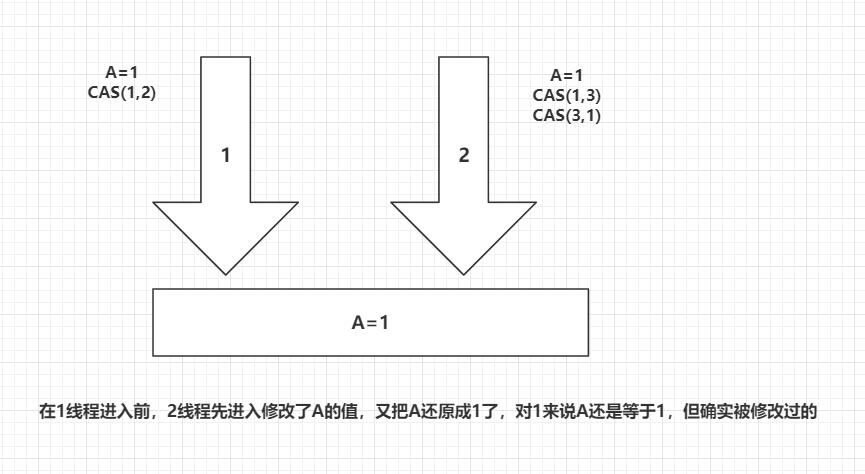
3、ABA问题
ABA问题也是面试常问的,接下来我们来探究下ABA问题
CAS:ABA问题
1 2 3 4 5 6 7 8 9 10 11 12 13 14 15 16 17 18 19 /\*\*@author 路飞@create 2021 /1 /22 public class CASDemo1 {public static void main (String[] args) {AtomicInteger atomicInteger = new AtomicInteger (2020 );2020 , 2022 ));2023 , 2022 ));
20.原子引用
解决ABA问题,引入原子引用!类似乐观锁
1 2 3 4 5 6 7 8 9 10 11 12 13 14 15 16 17 18 19 20 21 22 23 24 25 26 27 28 29 30 31 32 33 34 35 36 37 38 39 /\*\*@author 路飞@create 2021 /1 /22 public class CASDemo2 {public static void main (String[] args) {new AtomicStampedReference <Integer>(1 ,1 );new Thread (()->{int stamp = atomicStampedReference.getStamp();"a1=>" +atomicStampedReference.getStamp());try {2 );catch (InterruptedException e) {1 ,2 ,atomicStampedReference.getStamp(),atomicStampedReference.getStamp()+1 );"a2=>" +atomicStampedReference.getStamp());2 ,1 ,atomicStampedReference.getStamp(),atomicStampedReference.getStamp()+1 );"a3=>" +atomicStampedReference.getStamp());"a" ).start();new Thread (()->{int stamp = atomicStampedReference.getStamp();"b1=>" +stamp);try {2 );catch (InterruptedException e) {1 ,6 ,atomicStampedReference.getStamp(),atomicStampedReference.getStamp()+1 );"b2=>" +atomicStampedReference.getStamp());"b" ).start();
结果:
a1=>1
可以看到,每次在修改数据后获取stamp(类似版本号),都在+1,让线程知道自己获取到的值是被修改过的。
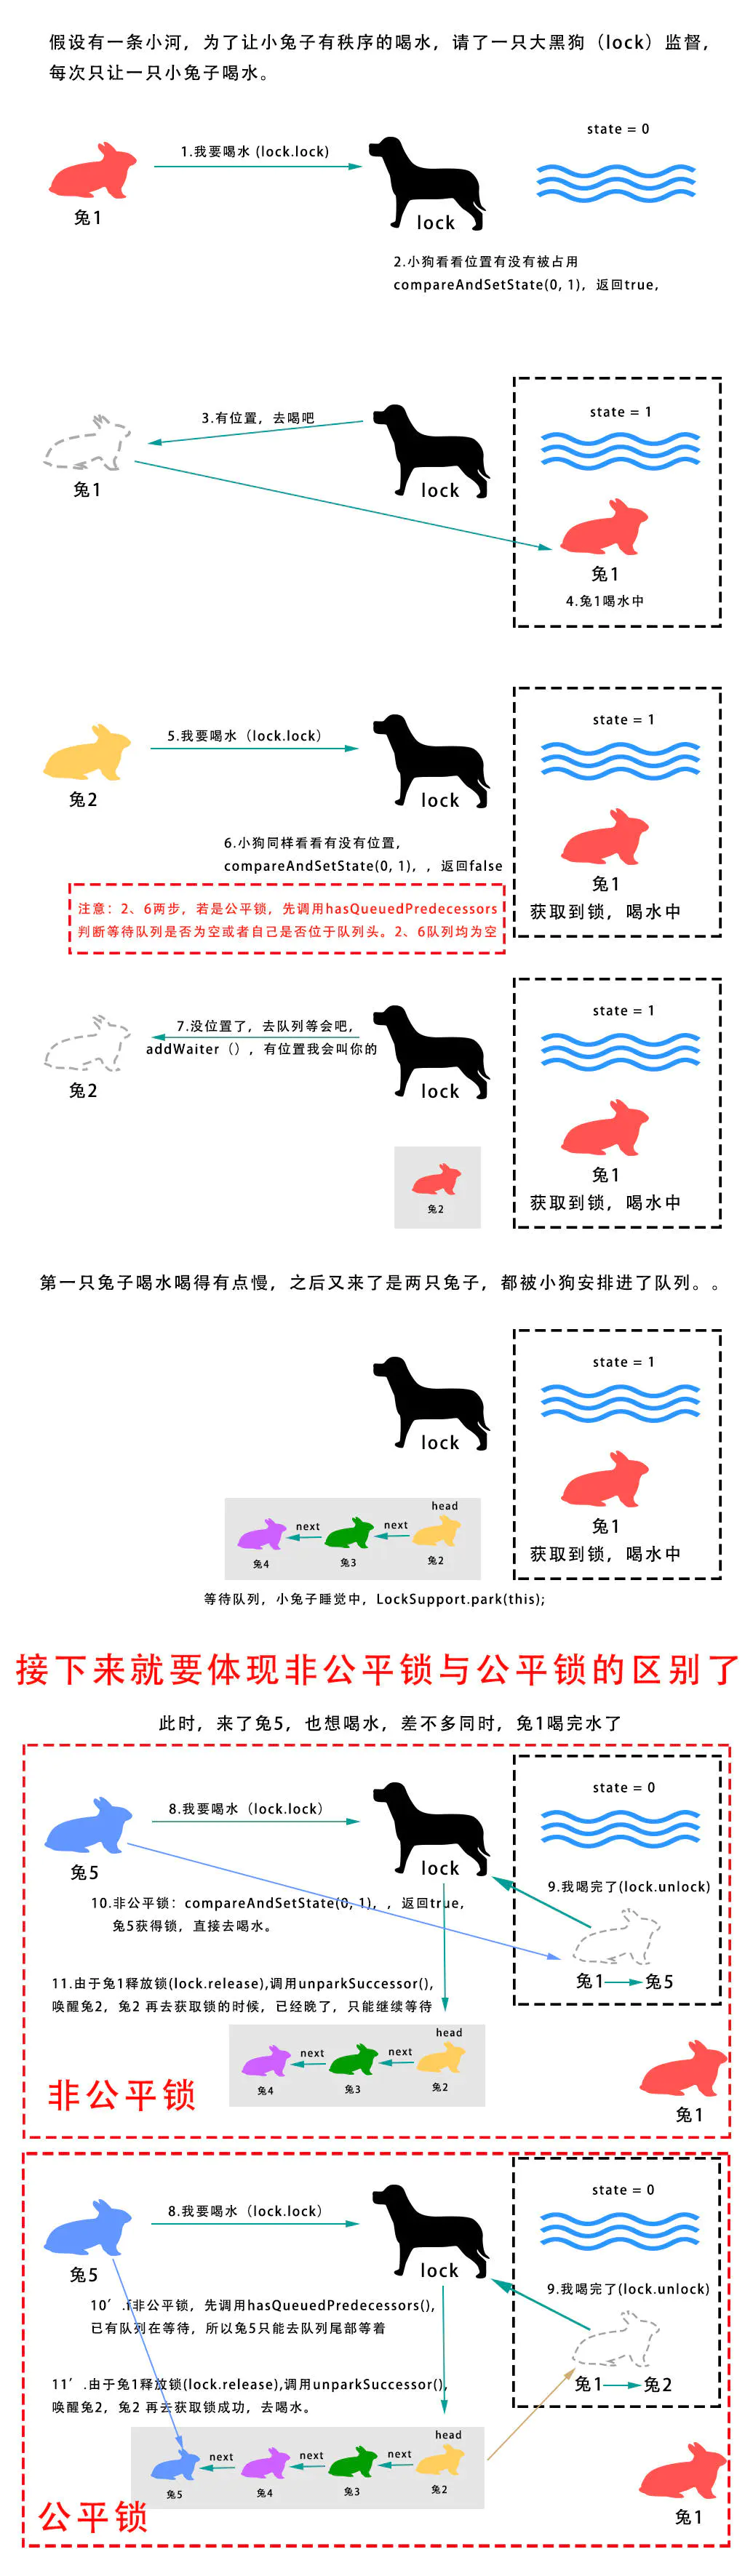
21.各种锁的理解 1.公平锁和非公平锁 公平锁: 非常公平, 不能够插队,必须先来后到!
非公平锁:非常不公平,可以插队 (默认都是非公平)
1 2 3 4 5 6 7 8 9 10 11 12 13 14 15 16 /\*\*@code ReentrantLock}.@code ReentrantLock(false )}.public ReentrantLock () {new NonfairSync ();@code ReentrantLock} with the@param fair {@code true } if this lock should use a fair ordering policypublic ReentrantLock (boolean fair) {new FairSync () : new NonfairSync ();
可以发现创建ReentrantLock,默认是走的无参构造,创建非公平锁
这种图是网上一个大佬画的,十分生动形象讲了公平锁和非公平锁的区别
一张图读懂非公平锁与公平锁
2.可重入锁 可重入锁(递归锁)
可重入性表现在同一个线程可以多次获得锁,而不同线程依然不可多次获得锁,底层涉及到AQS,后面出一篇讲AQS的博客,现在了解可重入锁的是什么样子就行
sync
1 2 3 4 5 6 7 8 9 10 11 12 13 14 15 16 17 18 19 20 21 22 23 24 25 26 27 28 29 30 31 32 33 /\*\*synchronized 版@author 路飞@create 2021 /1 /22 public class Demo01 {public static void main (String[] args) {Phone phone = new Phone ();new Thread (()->{"a" ).start();new Thread (()->{"b" ).start();class Phone {public synchronized void sms () {" sms" );new ReentrantLock ();public synchronized void call () {" call" );
lock
1 2 3 4 5 6 7 8 9 10 11 12 13 14 15 16 17 18 19 20 21 22 23 24 25 26 27 28 29 30 31 32 33 34 35 36 37 38 39 40 41 42 43 44 45 46 /\*\*@author 路飞@create 2021 /1 /22 public class Demo02 {public static void main (String[] args) {Phone2 phone = new Phone2 ();new Thread (()->{"a" ).start();new Thread (()->{"b" ).start();class Phone2 {Lock lock = new ReentrantLock ();public void sms () {try {" sms" );catch (Exception e){finally {public void call () {try {" call" );catch (Exception e){finally {
3.自旋锁 上面在引入原子类调用Unsafe类解决ABA问题,就看到了底层是用自旋锁去实现的
1
2
3
4
5
6
7
public final int getAndAddInt (Object var1, long var2, int var4) {int var5;do {this .getIntVolatile(var1, var2);while (!this .compareAndSwapInt(var1, var2, var5, var5 + var4)); return var5;
可以看到底层就是while的判断,不断去提交,我们可以手动实现一把自旋锁!
1 2 3 4 5 6 7 8 9 10 11 12 13 14 15 16 17 18 19 20 21 22 23 24 /\*\*@author 路飞@create 2021 /1 /22 public class SprinLockDemo {new AtomicReference <>();public void myLock () {Thread thread = Thread.currentThread();"==> mylock" );while (!atomicReference.compareAndSet(null , thread)) {public void myUnlock () {Thread thread = Thread.currentThread();"==> myUnlock" );null );
测试代码:
1 2 3 4 5 6 7 8 9 10 11 12 13 14 15 16 17 18 19 20 21 22 23 24 25 26 27 28 29 30 31 32 33 34 35 /\*\*@author 路飞@create 2021 /1 /22 public class TestSpinLock {public static void main (String[] args) {SprinLockDemo lock = new SprinLockDemo ();new Thread (()->{try {5 );catch (InterruptedException e) {finally {"T1" ).start();try {2 );catch (InterruptedException e) {new Thread (()->{try {2 );catch (InterruptedException e) {finally {"T2" ).start();
结果:
T1==> mylock
4.死锁
死锁是什么?
死锁一词应该是我们听的最多的了,数据库里的死锁,计算机网络里的死锁,那么死锁到底是什么呢?
死锁是指两个或两个以上的进程(线程)在运行过程中因争夺资源而造成的一种僵局(Deadly-Embrace) ) ,若无外力作用,这些进程(线程)都将无法向前推进。
死锁与饥饿的区别?
饥饿(Starvation)指一个进程一直得不到资源。
死锁和饥饿都是由于进程竞争资源而引起的。饥饿一般不占有资源,死锁进程一定占有资源。
这篇文章讲的不错:
死锁,死锁的四个必要条件以及处理策略
22.Gihub源码 JUC-Notes