1. Nginx介绍

Nginx是一款轻量级的Web服务器、反向代理服务器,由于它的内存占用少,启动极快,高并发能力强,在互联网项目中广泛应用。

上图基本上说明了当下流行的技术架构,其中Nginx有点入口网关的味道。

说了这么多,我们先安装玩玩吧

2. 安装Nginx

一般都是项目都是部署在linux上,这里我们采用Docker的方式启动Nginx,关于Docker的,上一篇有详细介绍

Docker

下面记录centos7利用Docker安装Nginx的命令

1
2
3
4
5
6
7
8
9
10
11
12
13
14
15
16
17
18
19
20
21
22
23
24
25
26
27
28
29
30
31
32
33
34
35
36
37
38
39
40
41
42
43
44
45
46
47
48
49
50
51
52
53
54
55
56
57
58
59
60
61
62
63
64
65
66
67
68
69
70
71
72
73
74
75
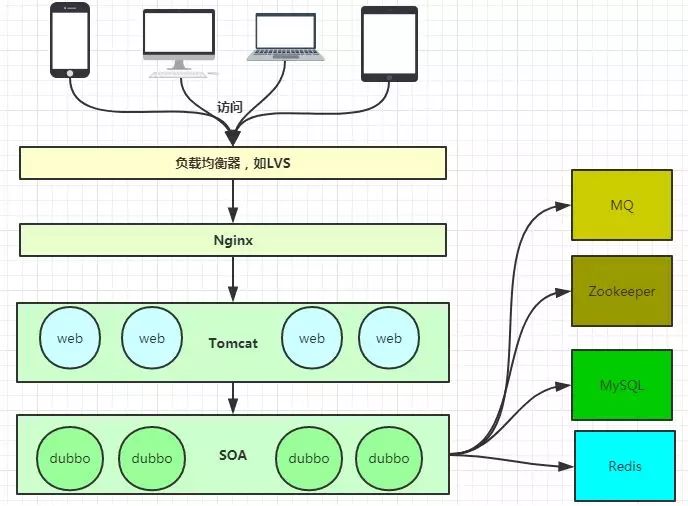
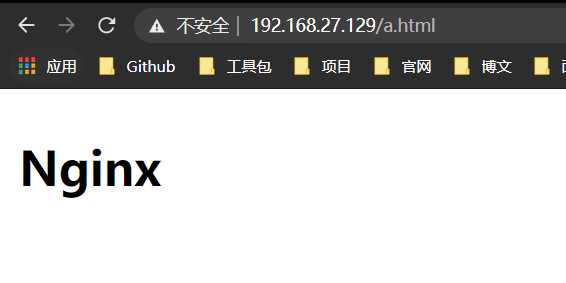
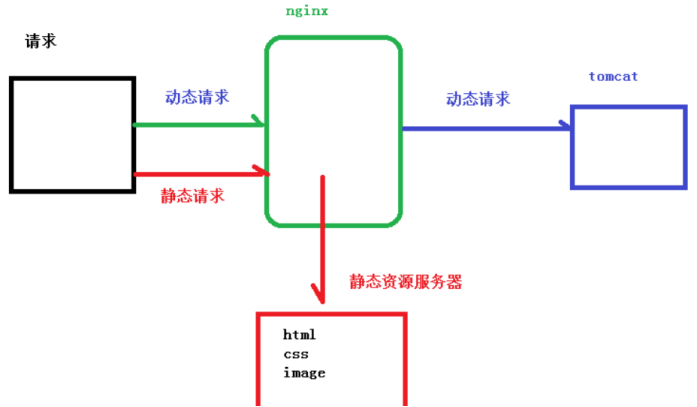
[root@hspEdu01 nginx]# docker pull nginx
Using default tag: latest
Trying to pull repository docker.io/library/nginx ...
latest: Pulling from docker.io/library/nginx
69692152171a: Already exists
30afc0b18f67: Pull complete
596b1d696923: Pull complete
febe5bd23e98: Pull complete
8283eee92e2f: Pull complete
351ad75a6cfa: Pull complete
Digest: sha256:6d75c99af15565a301e48297fa2d121e15d80ad526f8369c526324f0f7ccb750
Status: Downloaded newer image for docker.io/nginx:latest
[root@hspEdu01 nginx]# ls
conf logs www
[root@hspEdu01 nginx]# cd conf/
[root@hspEdu01 conf]# ls
nginx.conf
[root@hspEdu01 conf]# cd ../
[root@hspEdu01 nginx]# cd ../
[root@hspEdu01 ~]# rm -rf nginx/
[root@hspEdu01 ~]# ls
anaconda-ks.cfg data data2 initial-setup-ks.cfg mysql 公共 模板 视频 图片 文档 下载 音乐 桌面
[root@hspEdu01 ~]# docker run --name nginx-test -p 80:80 -d nginx
608ed67163e091695eb14f964cff6f4d24f2818275845f34254eff49e24fe770
[root@hspEdu01 ~]# docker ps -a
CONTAINER ID IMAGE COMMAND CREATED STATUS PORTS
608ed67163e0 nginx "/docker-entrypoin..." 4 seconds ago Up 2 seconds 0.0.0.0:80->80/tcp
760a2956258e a8e34 "java -jar app.jar" About an hour ago Up About an hour 0.0.0.0:8010->8010/tcp
95628d5d89c5 mysql:5.7 "docker-entrypoint..." About an hour ago Up About an hour 0.0.0.0:3306->3306/tcp, 33060/tc
[root@hspEdu01 ~]# mkdir -p /root/nginx/www /root/nginx/logs /root/nginx/conf
[root@hspEdu01 ~]# cd nginx/
[root@hspEdu01 nginx]# cd conf/
[root@hspEdu01 conf]# ls
[root@hspEdu01 conf]# docker cp 608e:/etc/nginx/nginx.conf /root/nginx/conf
[root@hspEdu01 conf]# ls
nginx.conf
[root@hspEdu01 conf]# docker rm -f 608e
608e
[root@hspEdu01 conf]# docker run -d -p 80:80 --name nginx-web -v /root/nginx/www:/usr/share/nginx/html -v /root/nginx/conf/nginx.conf:/etc/nginx/nginx.conf -v /root/nginx/logs:/var/log/nginx nginx
987bc07bc4eb474332766dfe6409d957e07bf94fc24153222cf8bf99147df717
[root@hspEdu01 conf]# docker ps -a
CONTAINER ID IMAGE COMMAND CREATED STATUS PORTS NAMES
987bc07bc4eb nginx "/docker-entrypoin..." 10 seconds ago Exited (1) 9 seconds ago nginx-web
760a2956258e a8e34 "java -jar app.jar" About an hour ago Up About an hour 0.0.0.0:8010->8010/tcp adoring_pare
95628d5d89c5 mysql:5.7 "docker-entrypoint..." About an hour ago Up About an hour 0.0.0.0:3306->3306/tcp, 33060/tcp mysql
[root@hspEdu01 conf]# docker logs -f 987b
/docker-entrypoint.sh: /docker-entrypoint.d/ is not empty, will attempt to perform configuration
/docker-entrypoint.sh: Looking for shell scripts in /docker-entrypoint.d/
/docker-entrypoint.sh: Launching /docker-entrypoint.d/10-listen-on-ipv6-by-default.sh
10-listen-on-ipv6-by-default.sh: info: Getting the checksum of /etc/nginx/conf.d/default.conf
10-listen-on-ipv6-by-default.sh: info: Enabled listen on IPv6 in /etc/nginx/conf.d/default.conf
/docker-entrypoint.sh: Launching /docker-entrypoint.d/20-envsubst-on-templates.sh
/docker-entrypoint.sh: Launching /docker-entrypoint.d/30-tune-worker-processes.sh
/docker-entrypoint.sh: Configuration complete; ready for start up
nginx: [alert] could not open error log file: open() "/var/log/nginx/error.log" failed (13: Permission denied)
2021/06/12 02:26:39 [emerg] 1#1: open() "/etc/nginx/nginx.conf" failed (13: Permission denied)
[root@hspEdu01 conf]# docker ps -a
CONTAINER ID IMAGE COMMAND CREATED STATUS PORTS NAMES
987bc07bc4eb nginx "/docker-entrypoin..." About a minute ago Exited (1) About a minute ago nginx-web
760a2956258e a8e34 "java -jar app.jar" About an hour ago Up About an hour 0.0.0.0:8010->8010/tcp adoring_pare
95628d5d89c5 mysql:5.7 "docker-entrypoint..." About an hour ago Up About an hour 0.0.0.0:3306->3306/tcp, 33060/tcp mysql
[root@hspEdu01 conf]# docker rm -f 987
987
[root@hspEdu01 conf]# docker run -d -p 80:80 --name nginx-web -v /root/nginx/www:/usr/share/nginx/html -v /root/nginx/conf/nginx.conf:/etc/nginx/nginx.conf -v /root/nginx/logs:/var/log/nginx --privileged=true nginx
6593ed8866071e1865217f58c627005aa8f3e9b3c8db6f5ff1aec22653503d1a
[root@hspEdu01 conf]# docker ps -a
CONTAINER ID IMAGE COMMAND CREATED STATUS PORTS NAMES
6593ed886607 nginx "/docker-entrypoin..." 5 seconds ago Up 3 seconds 0.0.0.0:80->80/tcp nginx-web
760a2956258e a8e34 "java -jar app.jar" About an hour ago Up About an hour 0.0.0.0:8010->8010/tcp adoring_pare
95628d5d89c5 mysql:5.7 "docker-entrypoint..." About an hour ago Up About an hour 0.0.0.0:3306->3306/tcp, 33060/tcp mysql
[root@hspEdu01 conf]# cd ../
[root@hspEdu01 nginx]# cd www/
[root@hspEdu01 www]# touch a.html
[root@hspEdu01 www]# vim a.html
[root@hspEdu01 www]#

这里我们创建了一个nginx-web的容器,并把它的网页目录,日志目录和配置文件目录挂载到宿主机,新建了一个a.html,因为Nginx的热部署的,所以我们直接在浏览器请求a.html即可

3. 负载均衡

在第二张图上,已经提到Nginx可以实现负载均衡,什么叫负载均衡呢?

如果请求数过大,单个服务器解决不了,我们增加服务器的数量,然后将请求分发到各个服务器上,将原先请求集中到单个服务器的情况改为请求分发到多个服务器上,就是负载均衡。

实现方式也很简单,在nginx.conf中upstream 指定后端服务器地址列表,在 server 中拦截响应请求,并将请求转发到 Upstream 中配置的服务器列表。

1. 轮询

这里我们利用Docker多端口启动3台Tomcat服务器,里面Nginx实现请求的负载均衡,下面记录详细命令:

1
2
3
4
5
6
7
8
9
10
11
12
13
14
15
16
17
18
19
20
21
22
23
24
25
26
27
28
29
30
31
32
33
34
35
36
37
38
39
40
41
42
[root@VM-0-15-centos conf]# docker run -p 8010:8080 -v /root/tomcat8010/webapps:/usr/local/tomcat/webapps -d --name tomcat8081 bcf990bea01a
a386923c309b971e5c09c1656f706313d074d62f1a898844513594f662463c07
#三台Tomcat启动方式都是一样的 只是参数和数据卷不一样而已,这里以最后一台为例子
[root@VM-0-15-centos conf]# docker ps -a
CONTAINER ID IMAGE COMMAND CREATED STATUS PORTS NAMES
a386923c309b bcf990bea01a "catalina.sh run" 4 seconds ago Up 3 seconds 0.0.0.0:8010->8080/tcp tomcat8081
5dbbb4db6e00 bcf990bea01a "catalina.sh run" 20 hours ago Up 20 hours 0.0.0.0:8881->8080/tcp tomcat-8881
216a2e8f1c90 bcf990bea01a "catalina.sh run" 20 hours ago Up 20 hours 0.0.0.0:8888->8080/tcp tomcat-8888
8499b0e39d0f bcf990bea01a "catalina.sh run" 21 hours ago Up 21 hours 0.0.0.0:8080->8080/tcp mytomcat
7dd71eee737f mysql:5.7 "docker-entrypoint..." 43 hours ago Up 43 hours 0.0.0.0:3306->3306/tcp, 33060/tcp mysql
52aa02d195d9 nginx "/docker-entrypoin..." 2 days ago Up 2 minutes 0.0.0.0:80->80/tcp nginx-web
[root@VM-0-15-centos conf]# cd /root
[root@VM-0-15-centos ~]# ls
aa.txt apps data demo dockerfile images meiyan mysql nginx RUNNING.txt test tomcat8010 tomcat-8881 tomcat8888 webapps
[root@VM-0-15-centos ~]# cd tomcat8010
[root@VM-0-15-centos tomcat8010]# ls
webapps
[root@VM-0-15-centos tomcat8010]# cd webapps
[root@VM-0-15-centos webapps]# mkdir edu
[root@VM-0-15-centos webapps]# cd edu
[root@VM-0-15-centos edu]# ouch a.html
-bash: ouch: command not found
[root@VM-0-15-centos edu]# touch a.html
[root@VM-0-15-centos edu]# vim a.html
[root@VM-0-15-centos edu]# cat a.html
<!DOCTYPE html>
<html>
<head>
<meta charset="utf-8">
<title></title>
</head>
<body>
<h3>Tomcat8010</h3>
</body>
</html>

[root@VM-0-15-centos edu]# cd /root/nginx/conf/
[root@VM-0-15-centos conf]# vim nginx.conf
#配置完nginx.conf 记得重启nginx服务
[root@VM-0-15-centos conf]# docker restart nginx-web
nginx-web
[root@VM-0-15-centos conf]#

这时候,我们可以在浏览器中访问http://118.195.164.41/edu/a.html,会发现它是跳转到不同的Tomcat上,即实现了负载均衡,这里只是第一种,我们并没设计细则,下面我们再展示讲述下其它几种:

2. 优先级

修改nginx.conf即可

1
2
3
4
5
6
7
8
9
10
11
12
13
14
15
16
17
18
19
20
21
22
23
24
25
26
27
28
29
30
31
32
33
34
35
36
37
38
39
40
41
42
43
44
45
46
47
48
49
50
[root@VM-0-15-centos conf]# cat nginx.conf 

user nginx;
worker_processes auto;

error_log /var/log/nginx/error.log notice;
pid /var/run/nginx.pid;


events {
worker_connections 1024;
}


http {
include /etc/nginx/mime.types;
default_type application/octet-stream;

log_format main '$remote_addr - $remote_user [$time_local] "$request" '
'$status $body_bytes_sent "$http_referer" '
'"$http_user_agent" "$http_x_forwarded_for"';

access_log /var/log/nginx/access.log main;
upstream myserver {
server 118.195.164.41:8080 weight=1;
server 118.195.164.41:8888 weight=10;
server 118.195.164.41:8881 weight=15;
server 118.195.164.41:8010 weight=20;
}


server{
listen 80;
charset utf-8;
server_name 118.195.164.41;


location / {
proxy_pass http://myserver;
}
}
sendfile on;
#tcp_nopush on;

keepalive_timeout 65;

#gzip on;

include /etc/nginx/conf.d/*.conf;
}

3.ip_hash

每个请求按访问ip的hash结果分配,这样每个访客固定访问一个后端服务器,可以解决session的问题。

1
2
3
4
5
6
7
8
9
10
11
12
13
14
15
16
17
18
19
20
21
22
23
24
25
26
27
28
29
30
31
32
33
34
35
36
37
38
39
40
41
42
43
44
45
46
47
48
49
50
51
[root@VM-0-15-centos conf]# cat nginx.conf 

user nginx;
worker_processes auto;

error_log /var/log/nginx/error.log notice;
pid /var/run/nginx.pid;


events {
worker_connections 1024;
}


http {
include /etc/nginx/mime.types;
default_type application/octet-stream;

log_format main '$remote_addr - $remote_user [$time_local] "$request" '
'$status $body_bytes_sent "$http_referer" '
'"$http_user_agent" "$http_x_forwarded_for"';

access_log /var/log/nginx/access.log main;
upstream myserver {
ip_hash;
server 118.195.164.41:8080 ;
server 118.195.164.41:8888 ;
server 118.195.164.41:8881 ;
server 118.195.164.41:8010 ;
}


server{
listen 80;
charset utf-8;
server_name 118.195.164.41;


location / {
proxy_pass http://myserver;
}
}
sendfile on;
#tcp_nopush on;

keepalive_timeout 65;

#gzip on;

include /etc/nginx/conf.d/*.conf;
}

4.fair(第三方)

按后端服务器的响应时间来分配请求,响应时间短的优先分配。

需要安装其它依赖,这里就不测试了

4. 反向代理

经常听人说到一些术语,如反向代理,那么什么是反向代理,什么又是正向代理呢?

​ 正向代理示意图

​ 反向代理示意图

由于防火墙的原因,我们并不能直接访问谷歌,那么我们可以借助VPN来实现,这就是一个简单的正向代理的例子。这里你能够发现,正向代理“代理”的是客户端,而且客户端是知道目标的,而目标是不知道客户端是通过VPN访问的。

当我们在外网访问百度的时候,其实会进行一个转发,代理到内网去,这就是所谓的反向代理,即反向代理“代理”的是服务器端,而且这一个过程对于客户端而言是透明的。

Nginx实现反向代理是很容易的,下面记录详细命令:

1
2
3
4
5
6
7
8
9
10
11
12
13
14
15
16
17
18
19
20
21
22
23
24
25
26
27
28
29
30
31
32
33
34
35
36
37
38
39
40
41
42
43
44
45
46
47
48
49
50
51
52
53
54
55
56
57
58
59
60
61
62
63
64
65
[root@VM-0-15-centos conf]# docker ps -a
CONTAINER ID IMAGE COMMAND CREATED STATUS PORTS NAMES
a386923c309b bcf990bea01a "catalina.sh run" 22 hours ago Up 22 hours 0.0.0.0:8010->8080/tcp tomcat8081
5dbbb4db6e00 bcf990bea01a "catalina.sh run" 42 hours ago Up 42 hours 0.0.0.0:8881->8080/tcp tomcat-8881
216a2e8f1c90 bcf990bea01a "catalina.sh run" 43 hours ago Up 43 hours 0.0.0.0:8888->8080/tcp tomcat-8888
8499b0e39d0f bcf990bea01a "catalina.sh run" 43 hours ago Up 43 hours 0.0.0.0:8080->8080/tcp mytomcat
7dd71eee737f mysql:5.7 "docker-entrypoint..." 2 days ago Up 2 days 0.0.0.0:3306->3306/tcp, 33060/tcp mysql
52aa02d195d9 nginx "/docker-entrypoin..." 2 days ago Up 39 seconds 0.0.0.0:80->80/tcp nginx-web
[root@VM-0-15-centos conf]# vim nginx.conf
[root@VM-0-15-centos conf]# cat nginx.conf

user nginx;
worker_processes auto;

error_log /var/log/nginx/error.log notice;
pid /var/run/nginx.pid;


events {
worker_connections 1024;
}


http {
include /etc/nginx/mime.types;
default_type application/octet-stream;

log_format main '$remote_addr - $remote_user [$time_local] "$request" '
'$status $body_bytes_sent "$http_referer" '
'"$http_user_agent" "$http_x_forwarded_for"';

access_log /var/log/nginx/access.log main;
upstream myserver {
server 118.195.164.41:8080 ;
server 118.195.164.41:8888 ;
server 118.195.164.41:8881 ;
server 118.195.164.41:8010 ;
}

server{
listen 80;
charset utf-8;
server_name 118.195.164.41;


location / {
proxy_pass http://118.195.164.41:8888/edu/a.html;
proxy_redirect default;
}
}
sendfile on;
#tcp_nopush on;

keepalive_timeout 65;

#gzip on;

include /etc/nginx/conf.d/*.conf;
}
[root@VM-0-15-centos conf]# docker restart nginx-web
nginx-web
[root@VM-0-15-centos conf]# vim nginx.conf
[root@VM-0-15-centos conf]# docker restart nginx-web
nginx-web
[root@VM-0-15-centos conf]#

使用方向代理,让访问80端口的请求重定向到8888端口下的一个页面,测试成功!

关于location的配置,主要就是对访问路径进行设置,有很多,下面这篇博文讲的很好:

nginx的location配置详解

5. 动静分离

Nginx 动静分离简单来说就是把动态跟静态请求分开,不能理解成只是单纯的把动态页面和静态页面物理分离。严格意义上说应该是动态请求跟静态请求分开,可以理解成使用 Nginx处理静态页面,Tomcat 处理动态页面。动静分离从目前实现角度来讲大致分为两种,一种是纯粹把静态文件独立成单独的域名,放在独立的服务器上,也是目前主流推崇的方案;

另外一种方法就是动态跟静态文件混合在一起发布,通过 nginx 来分开。通过 location 指定不同的后缀名实现不同的请求转发。通过 expires 参数设置,可以使浏览器缓存过期时间,减少与服务器之前的请求和流量。具体 Expires 定义:是给一个资源设定一个过期时间,也就是说无需去服务端验证,直接通过浏览器自身确认是否过期即可,

所以不会产生额外的流量。此种方法非常适合不经常变动的资源。(如果经常更新的文件,不建议使用 Expires 来缓存),我这里设置 3d,表示在这 3 天之内访问这个 URL,发送一个请求,比对服务器该文件最后更新时间没有变化,则不会从服务器抓取,返回状态码 304,如果有修改,则直接从服务器重新下载,返回状态码 200。

对于这个配置,其实就是在location配置下路径,但我一直没成功,不知道为什么!!配置如下:

1
2
3
4
5
6
7
8
9
10
11
12
13
14
15
16
17
18
19
20
21
22
23
24
25
26
27
28
29
30
31
32
33
34
35
36
37
38
39
40
41
42
43
44
45
46
47
48
49
50
51
52
53
54
55
56
57
58
59
60
user  nginx;
worker_processes auto;

error_log /var/log/nginx/error.log notice;
pid /var/run/nginx.pid;


events {
worker_connections 1024;
}


http {
include /etc/nginx/mime.types;
default_type application/octet-stream;

log_format main '$remote_addr - $remote_user [$time_local] "$request" '
'$status $body_bytes_sent "$http_referer" '
'"$http_user_agent" "$http_x_forwarded_for"';

upstream static {
server 118.195.164.41:80;
}

upstream dynamic {
server 118.195.164.41:8080 ;
# server 118.195.164.41:8888 ;
# server 118.195.164.41:8881 ;
# server 118.195.164.41:8010 ;
}

server{
listen 80;
charset utf-8;
server_name 118.195.164.41;


# 拦截动态资源
location ~ .*\.(php|jsp)$ {
proxy_pass http://dynamic;
}

# 拦截静态资源
location ~ .*\.(jpg|png|htm|html|css|js)$ {
root /data/; #html目录
proxy_pass http://static;
autoindex on; #自动打开文件列表
}

}
sendfile on;
#tcp_nopush on;

keepalive_timeout 65;

#gzip on;

include /etc/nginx/conf.d/*.conf;
}

后面有时间再更新Nginx的~

6. 参考文章

8分钟带你深入浅出搞懂Nginx