SpringBoot之集成Redis
Redis官网 对Redis的介绍:
Redis is an open source (BSD licensed), in-memory data structure store, used as a database, cache, and message broker. Redis provides data structures such as strings, hashes, lists, sets, sorted sets with range queries, bitmaps, hyperloglogs, geospatial indexes, and streams. Redis has built-in replication, Lua scripting, LRU eviction, transactions, and different levels of on-disk persistence, and provides high availability via Redis Sentinel and automatic partitioning with Redis Cluster.
简单的翻译下:Redis是一款基于内存的键值对数据库,用作数据库,缓存和消息代理。Redis提供数据结构,例如字符串,哈希,列表,集合,带范围查询的排序集合,位图,超日志,地理空间索引和流。总之很强大就是了。
1.Redis介绍 Redis是现在最受欢迎的NoSQL数据库之一,Redis是一个使用ANSI C编写的开源、包含多种数据结构、支持网络、基于内存、可选持久性的键值对存储数据库,其具备如下特性:
基于内存运行,性能高效
支持分布式,理论上可以无限扩展
key-value存储系统
开源的使用ANSI C语言编写、遵守BSD协议、支持网络、可基于内存亦可持久化的日志型、Key-Value数据库,并提供多种语言的API
相比于其他数据库类型,Redis具备的特点是:
C/S通讯模型
单进程单线程模型
丰富的数据类型
操作具有原子性
持久化
高并发读写
支持lua脚本
哪些大厂在使用Redis?
github
twitter
Stack Overflow
阿里巴巴
美团
Redis的应用场景有哪些?
Redis 的应用场景包括:缓存系统(“热点”数据:高频读、低频写)、计数器、消息队列系统、排行榜、社交网络和实时系统。
比如常见的电商场景,根据商品 ID 获取商品信息时,店铺信息和商品详情信息就可以缓存在 Redis,直接从 Redis 获取。 减少了去数据库查询的次数。但会出现新的问题,就是如何对缓存进行更新?这就是下面要讲的。
Redis的数据类型及主要特性?
Redis提供的数据类型主要分为5种自有类型和一种自定义类型,这5种自有类型包括:String类型、哈希类型、列表类型、集合类型和顺序集合类型。
2.Redis更新策略 参考《缓存更新的套路》 ,缓存更新的模式有四种:
Cache aside
Read through
Write through
Write behind caching
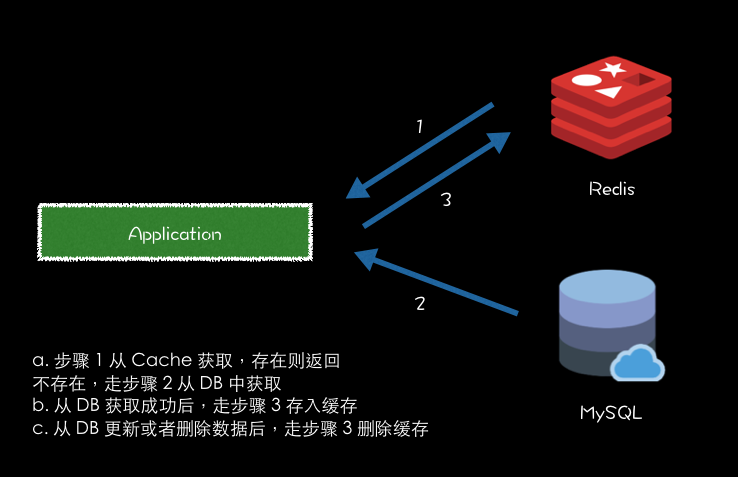
这里我们使用的是 Cache Aside 策略,从三个维度:
失效:应用程序先从cache取数据,没有得到,则从数据库中取数据,成功后,放到缓存中。
命中:应用程序从cache中取数据,取到后返回。
更新:先把数据存到数据库中,成功后,再让缓存失效。
大致流程如下:
获取商品详情举例
从商品 Cache 中获取商品详情,如果存在,则返回获取 Cache 数据返回。
如果不存在,则从商品 DB 中获取。获取成功后,将数据存到 Cache 中。则下次获取商品详情,就可以从 Cache 就可以得到商品详情数据。
从商品 DB 中更新或者删除商品详情成功后,则从缓存中删除对应商品的详情缓存
3.添加maven依赖 我们以Mybatis做数据访问层操作,Redis做缓存操作
1 2 3 4 5 6 7 8 9 10 11 12 13 14 15 16 17 18 19 20 21 22 23 24 25 26 27 28 29 30 31 32 33 34 35 36 37 38 39 40 41 42 43 44 45 46 47 48 49 50 51 52 53 54 55 56 57 58 59 60 61 62 63 64 65 66 67 68 69 70 71 72 <dependencies > <dependency > <groupId > org.springframework.boot</groupId > <artifactId > spring-boot-starter</artifactId > </dependency > <dependency > <groupId > org.springframework.boot</groupId > <artifactId > spring-boot-starter-web</artifactId > </dependency > <dependency > <groupId > org.springframework.boot</groupId > <artifactId > spring-boot-devtools</artifactId > <scope > runtime</scope > <optional > true</optional > </dependency > <dependency > <groupId > org.projectlombok</groupId > <artifactId > lombok</artifactId > <optional > true</optional > </dependency > <dependency > <groupId > mysql</groupId > <artifactId > mysql-connector-java</artifactId > <version > 5.1.17</version > </dependency > <dependency > <groupId > org.mybatis.spring.boot</groupId > <artifactId > mybatis-spring-boot-starter</artifactId > <version > 2.1.2</version > </dependency > <dependency > <groupId > com.alibaba</groupId > <artifactId > druid</artifactId > <version > 1.1.1</version > </dependency > <dependency > <groupId > org.springframework.boot</groupId > <artifactId > spring-boot-starter-data-redis</artifactId > <version > 2.3.4.RELEASE</version > </dependency > <dependency > <groupId > cn.hutool</groupId > <artifactId > hutool-all</artifactId > <version > 5.3.10</version > </dependency > <dependency > <groupId > com.alibaba</groupId > <artifactId > fastjson</artifactId > <version > 1.2.57</version > </dependency > <dependency > <groupId > junit</groupId > <artifactId > junit</artifactId > <version > 3.8.1</version > </dependency > <dependency > <groupId > org.springframework.boot</groupId > <artifactId > spring-boot-starter-test</artifactId > <scope > test</scope > <exclusions > <exclusion > <groupId > org.junit.vintage</groupId > <artifactId > junit-vintage-engine</artifactId > </exclusion > </exclusions > </dependency > </dependencies >
4.配置application.properties 1 2 3 4 5 6 7 8 9 10 11 12 13 14 15 16 17 18 19 20 21 22 23 24 25 26 27 28 29 server.port =8009 spring.datasorce.type =com.alibaba.druid.pool.DruidDataSource spring.datasource.driverClassName =com.mysql.jdbc.Driver mybatis.type-aliases-package =com.dev.entity spring.datasource.url =jdbc:mysql://localhost:3306/mybatis-plus?useUnicode=true&characterEncoding=UTF-8 spring.datasource.username =root spring.datasource.password =123456 mybatis.configuration.map-underscore-to-camel-case =false logging.level.com.dev.mapper =debug spring.redis.database =0 spring.redis.host =127.0.0.1 spring.redis.port =6379 spring.redis.password =spring.redis.jedis.pool.max-active =20 spring.redis.jedis.pool.max-wait =-1 spring.redis.jedis.pool.max-idle =10 spring.redis.jedis.pool.min-idle =0 spring.redis.timeout =1000
5.添加Redis序列化配置类 RedisTemplate 默认使用JDK的序列化机制, 存储二进制字节码, 所以自定义序列化类
1 2 3 4 5 6 7 8 9 10 11 12 13 14 15 16 17 18 19 20 21 22 23 24 25 26 27 28 29 30 31 32 33 34 35 36 37 38 /\*\*@author 路飞@create 2021 /1 /5 @Configuration @EnableCaching public class RedisConfig {@Bean public RedisTemplate<String, Object> redisTemplate (RedisConnectionFactory redisConnectionFactory) {Jackson2JsonRedisSerializer jackson2JsonRedisSerializer = new Jackson2JsonRedisSerializer (Object.class);ObjectMapper om = new ObjectMapper ();new RedisTemplate <>();RedisSerializer stringSerializer = new StringRedisSerializer ();return redisTemplate;@Bean public CacheManager cacheManager (RedisConnectionFactory redisConnectionFactory) {RedisCacheManagerBuilder builder = RedisCacheManagerreturn builder.build();
6.使用演示 基于缓存更新策略,我们从三个维度测试Redis的失效,命中和更新
service.java
1 2 3 4 5 6 7 8 9 10 11 12 13 14 15 16 17 18 19 20 21 22 23 24 25 26 27 28 29 30 31 32 33 34 35 36 37 38 39 40 41 42 43 44 45 46 47 48 49 50 51 52 53 54 55 56 57 58 59 60 61 62 63 64 65 66 67 68 69 70 71 72 73 74 75 76 /\*\*@author 路飞@create 2021 /1 /5 @Service @Transactional public class UserService {@Autowired private UserMapper userDao;@Autowired private RedisTemplate redisTemplate;public List<User> queryAll () {return userDao.queryAll();public User findUserById (int id) {String key = "user\_" +id;boolean hasKey = redisTemplate.hasKey(key);if (hasKey){User user = operations.get(key);"从缓存中获取数据:" +user.getUserName());"-----------------------------" );return user;else {User user = userDao.findUserById(id);if (user != null ){"查询数据库获取数据:" +user.getUserName());"------------写入缓存---------------------" );5 , TimeUnit.HOURS);return user;return null ;public int deleteUserById (int id) {int result = userDao.deleteUserById(id);String key = "user\_" +id;if (result!=0 ){boolean hasKey = redisTemplate.hasKey(key);if (hasKey){"删除了缓存中的key:" +key);return result;public int updateUser (User user) {int result = userDao.updateUser(user);if (result != 0 ) {String key = "user\_" + user.getId();boolean haskey = redisTemplate.hasKey(key);if (haskey) {"删除缓存中的key-----------> " + key);User userNew = userDao.findUserById(user.getId());if (userNew != null ) {3 , TimeUnit.HOURS);return result;
一般我用封装的RedisTemplate类去操作缓存,其中设置缓存,更新缓存,删除缓存的操作在上面代码中有详细注释,这里就不过多参数。
利用Postman测试接口,在控制台即可看到缓存生效,测试成功!
7.GitHub源码 springboot-redis
8.总结 Redis的用途远不及做缓存,还可以实现分布式锁、简单的mq和搭建高性能集群等等,这里只是简单的讲SpringBoot如何集成Redis,使得缓存生效!后面我还会详细讲Redis的应用。


